Microsoft are rolling out a new feature for Entra ID access packages that gives organisations greater control over the information shared during the approval process. This preview feature allows administrators to decide whether users requesting access to resources via access packages can see the details of their approvers. It’s a simple change, but a significant update that enhances both privacy and transparency, depending on your organisation’s needs. Let’s dive into why this change matters and how you can put it to use.
Note: This change is still in preview and not all capabilities may be available yet.
Why is this change is important
Previously, when a user requested an access package, the details of the designated approver were not visible to them in the ‘My Access’ portal. While some organisations may prefer to continue to keep this information private, this level of transparency is useful for letting users know who to chase up in the event of a delay.
This new update introduces a simple choice to show or hide approver details, which can now be configured at two levels:
Tenant-wide: Set a default behaviour for all access packages in your organisation.
Per Access Package: Override the default for specific packages that might handle more sensitive resources.
This is important because it gives you granular control. For general access requests, showing the approver might be fine. But for packages granting access to high-security applications or data, you might want to conceal the approver’s identity. This flexibility helps organisations align their access management processes with their internal privacy and communication policies.
How to configure approver visibility with PowerShell for specific Access Packages
As of the time I am writing this article, the ability to configure the approver settings via the admin portal is not yet possible, even though Microsoft have updated the documentation to support it. However, after some investigation, I have figured out how to enable this setting using PowerShell, so if you want to enable these settings today, follow these steps:
2. Select your target Access package, then select policies and edit your target policy.
3. Click through the wizard to the final page where the Update button is visible, then on that page, right click anywhere on the screen and click Inspect, which will open the browser developer console
4. Open the Network tab and click Update at the bottom of the policy wizard. You will see requests populate on the screen, find the first request with the PUT method, right-click it and select Copy > Copy as PowerShell.
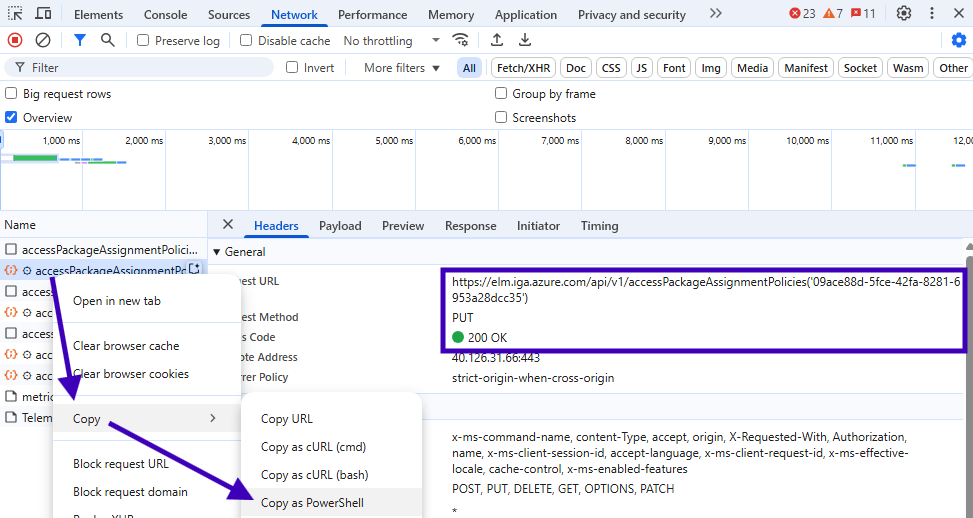
5. Now, open up PowerShell ISE and click CTRL+F to open the find tool and search for “Visible“. You should find the isApproverInformationVisibleToRequestor property, change this value to true and click the green play button to run the script.

This will send an authorised change request to the ID Governance service to update the setting on the backend.
How to configure approver visibility in Microsoft Entra for specific access packages
To configure the approver visibility for requestors in the Microsoft Entra admin portal, follow these steps:
2. On the Requests tab, scroll down to the Approval section and click Show advanced request settings.
3. Set the show approver details on pending access package requests to either Yes or No.
Configure tenant-level settings for approver visibility
These settings can also be controlled at tenant level, for example, if you do not want to set it access package level. Follow the steps below to configure tenant-level settings:
In the Microsoft Entra admin center, go to Identity Governance > Entitlement management > Control configurations.
Under My Access settings for end users, find Show approver details to members on pending access package requests (preview).
Choose the desired behaviour:
Checked – All members (excluding guests) will see their approver’s name and email address on pending access package requests in My Access.
Unchecked – Members won’t see approver details by default.
- Click Save.
The user experience
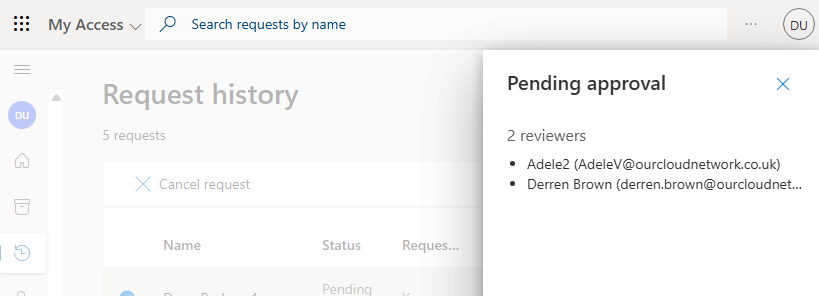
At the time of writing this article, making this change will not be reflected visibly in the Microsoft Entra portal. However, when this setting is enabled, the user goes to the ‘My Access’ portal, views their request history, and can see the name and contact details of the pending approver when clicking on the Details hyperlink. Which is great if they need to follow up.

When you click on this link, a new window will overlap the previous with the requestors details.