

Agent Identity Blueprints are used to create Agent Identities and request tokens using those identities. It’s important to know how to create these Blueprints with Microsoft Graph PowerShell as no functionality currently exists in the Microsoft Entra admin centre.
In this article, I walk you through how to create Agent Identity Blueprints and Agent Identity Blueprint Principals via Microsoft Graph PowerShell, as well as show you how to resolve some nuances with viewing your Blueprints and correct some errors in the Microsoft documentation.
Page Contents
What is an Agent Blueprint?
Blueprints are parent templates that power agent identities in your tenant. Essentially, they are used to create new Identities and centralise the configuration of these Agent Identities, similar to how an App Registration is linked to an Enterprise Application. An Agent Blueprint is also created from 2 parts, the Agent Blueprint (which defines the settings on the Agent) and the Agent Blueprint Principal, which services as the principal (or identities/instance) of your Blueprint in Microsoft Entra. I go into more detail on this topic in my article What is Microsoft Entra Agent ID.
Pre-requisites
To create an Agent Blueprint with Microsoft Graph PowerShell you need first need to have the Microsoft.Graph.Authentication PowerShell module installed. You can install this module by running the following command in your PowerShell v7 session:
Install-Module Microsoft.Graph.AuthenticationNext you must connect to Microsoft Graph with the necessary permissions; AgentIdentityBlueprint.Create & AgentIdentityBlueprintPrincipal.Create. These are the minimum level of delegated permissions required to create you Agent Bluepint. You can use the below command to connect to Microsoft Graph and when prompted, sign-in as a Global Administrator to accept the permissions consent.
Connect-MgGraph -Scopes @(
    "AgentIdentityBlueprint.Create",
    "AgentIdentityBlueprintPrincipal.Create"
)
How to create an Agent Blueprint
To create your Agent Identity Blueprint, all you need is to define the BluePrint name as well as who the sponsors and owners are. You can define the sponsors and owners as their own arrays (meaning you can have multiple) but for the purpose of this article, I will use a single sponsor and owner.
Use the below example command to create a new Agent Blueprint in your tenant.
# Define these variables
$BlueprintDisplayName = "OcnAgentBluePrint02"
$sponsorUserId = "d27e5154-9e45-493c-a170-dc4ba69c28a2"
$ownerUserId = "d27e5154-9e45-493c-a170-dc4ba69c28a2"

# Create the Agent Blueprint body
$uri = "https://graph.microsoft.com/beta/applications/graph.agentIdentityBlueprint"
$body = @{
    displayName = $BlueprintDisplayName
    "[email protected]" = @("https://graph.microsoft.com/v1.0/users/$sponsorUserId")
    "[email protected]" = @("https://graph.microsoft.com/v1.0/users/$sponsorUserId")
}

# Make the Agent blueprint
$Blueprint = Invoke-MgGraphRequest -Method Post -Uri $uri -Body $Body -OutputType PSObject

# Display the Agent Blueprint
$Blueprint
How to create an Agent Blueprint Principal
Once you have your Blueprint, you also need to create a service principals for the Agent Identity Blueprint for it to appear in Agent ID and be usable. Use the below commands which use the stored Blueprint AppId from the last section to create the Agent Blueprint Principal.
$uri = "https://graph.microsoft.com/beta/servicePrincipals/microsoft.graph.agentIdentityBlueprintPrincipal"
$body = @{
    appId = $Blueprint.appId
}
$BluePrintSp = Invoke-MgGraphRequest -Method Post -Uri $uri -Body $Body -OutputType PSObject
Once the a Agent Blueprint Principal is created, it doesn’t seem to be visible from the Enterprise Apps blade in the Microsoft Entra admin center. However, by modifying the below URL with the ID and AppID from the response to your above commands, you can see the Service Principal.
https://entra.microsoft.com/#view/Microsoft_AAD_IAM/ManagedAppMenuBlade/~/Overview/objectId/7ff62d6c-922c-4ac2-bae8-f04a2100db94/appId/30a3c794-2d76-482e-afa5-9ae5b900d994/preferredSingleSignOnMode~/null/servicePrincipalType/Application/fromNav/
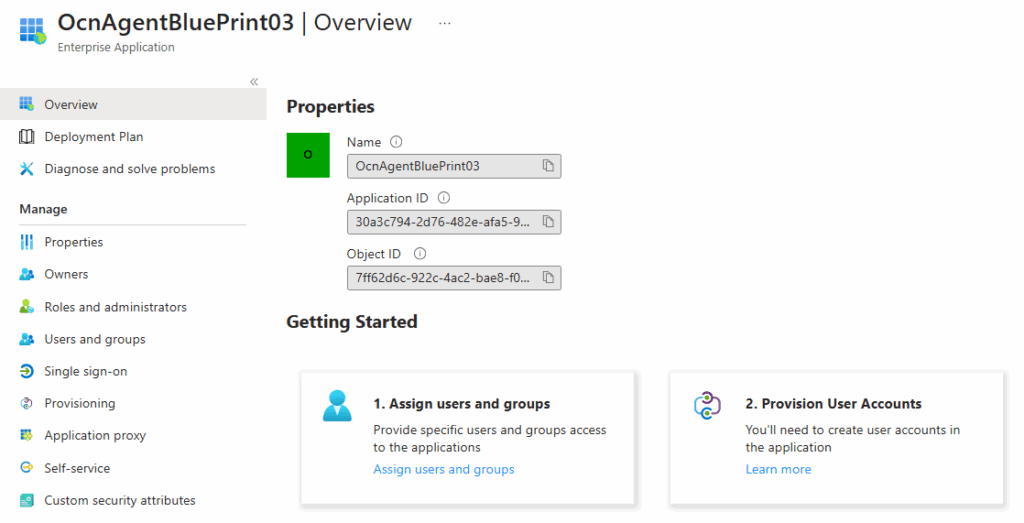
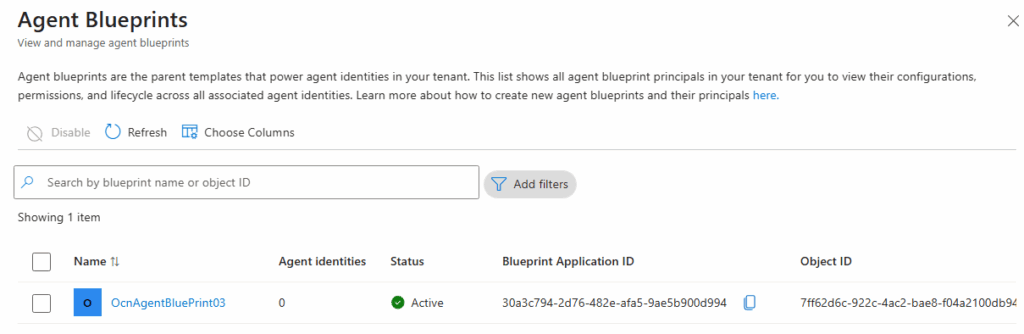
To view your Agent Identity Blueprint from the Microsoft Entra properly, navigate to Entra ID > Agent ID > Overview, then scroll down to Agent Blueprints and click View all.

Here you can see all the information you need to create Agent Identities from your Blueprint, as well as see which Agent Identities are link to (or created from) your Agent Blueprint.
Configure credentials for your Agent Identity Blueprint
As your Blueprint serves as the template for creating Agent Identities, you want to configure credentials so your Agent Identity can access resources in your tenant. I recommend you configure Managed Identity Federation for your Agent Identity Blueprint which means no passwords are used in the authentication process. For this step, you must already have your Managed Identity created in your tenant.
Start by connecting to Microsoft Graph with some additional permissions to before, this time, the AgentIdentityBlueprint.AddRemoveCreds.All permission.
Connect-MgGraph -Scopes "AgentIdentityBlueprint.AddRemoveCreds.All"Once connected, use the below example commands to federate your Agent Blueprint with your Managed Identity.
Note: The Microsoft documentation states (as of 19/11/2025) that you must specify the Blueprint Object Id, this is in correct and I have made a PR to update the documentation here. (This also applies to the next section)
$tenantId = "4e67cd72-f73a-42aa-a841-b8dd6ec328ca" # Your tenant ID
$ManagedIdentityId = "390b937d-b256-47ed-9567-45de6d617457" # Object ID of your Managed Identity
$BlueprintId = "30a3c794-2d76-482e-afa5-9ae5b900d994" # Application ID of your Blueprint

$Credential = @{
  Name      = "agent-msi"
  Issuer    = "https://login.microsoftonline.com/$tenantId/v2.0"
  Subject   = $ManagedIdentityId
  Audiences = @("api://AzureADTokenExchange")
}

$uri = "beta/applications/$BlueprintId/federatedIdentityCredentials"
Invoke-MgGraphRequest -Method Post -Uri $uri -Body $Credential -OutputType PSObject
Configure the identifier URI and scope for your Agent Identity Blueprint
To enable your Agent Identities to receive requests from users and other Agents in A2A (Agent to Agent) workflows, you need to configure the identifier URI (which the essential the reply URL) and also the OAuth scope (which defines the level of access) for your Agent Identity Blueprint.
First, connect to Microsoft Graph with the AgentIdentityBlueprint.ReadWrite.All permission using the below command:
Connect-MgGraph -Scopes "AgentIdentityBlueprint.ReadWrite.All"Now use the below commands to update the URI and scope for your Agent Identity Blueprint application.
$AppId = "30a3c794-2d76-482e-afa5-9ae5b900d994" # Application ID of your Blueprint
$IdentifierUri = "api://30a3c794-2d76-482e-afa5-9ae5b900d994" # Application ID of your Blueprint
$ScopeId = [guid]::NewGuid()

# Construct the OAuth2 permission scope
$scope = @{
    adminConsentDescription = "Allow the application to access the agent on behalf of the signed-in user."
    adminConsentDisplayName = "Access agent"
    id = $ScopeId
    isEnabled = $true
    type = "User"
    value = "access_agent"
}

# Create the request body
$body = @{
    identifierUris = @($IdentifierUri)
    api = @{
        oauth2PermissionScopes = @($scope)
    }
}

# Make the request
$uri = "beta/applications/$AppId"
Invoke-MgGraphRequest -Uri $uri -Method Patch -body $body -OutputType PSObject
Verify your Agent Blueprint Settings
The easiest way to verify your Agent Identity Blueprint settings have successfully updated is to open the application in the Microsoft Entra admin center and view the manifest. This isn’t as simple as it sounds as the “App Registration” isn’t visible, instead you need to construct the URL and browser directly to that URL. Here is an example:
https://entra.microsoft.com/#view/Microsoft_AAD_RegisteredApps/ApplicationMenuBlade/~/Manifest/appId/30a3c794-2d76-482e-afa5-9ae5b900d994/isMSAApp~/false
For the example above, the BOLD text is the App ID of my Blueprint. Modify this value and browse to the URL, then under the Manage section, click Manifest.

